문가가 공부한 기록입니다. 부정확한 내용은 편히 지적 부탁드립니다.

인터페이스(Interface)를 알아보기 전에 접근 제한자 readonly에 대해서 먼저 알아보고 시작하자!
type Words = {
[key:string] : string
}
class Dict {
private words: Words
constructor(){
this.words = {}
}
add(word:Word){
if(this.words[word.term] === undefined){
this.words[word.term] = word.def;
}
}
def(term:string){
return this.words[term]
}
}
class Word {
constructor(
public term:string,
public def:string
){}
}
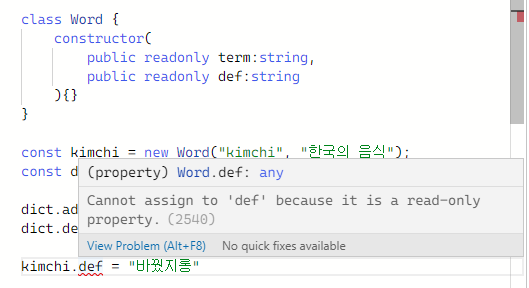
const kimchi = new Word("kimchi", "한국의 음식");
const dict = new Dict()
dict.add(kimchi);
dict.def("kimchi");현재 위 코드에서 Word의 클래스의 필드 term과 def는 접근 제한자(member visibility)가 public으로 되어있다. 이는 클래스 외부에서 인스턴스의 필드 값을 임의로 바꿀 수 있다는 의미다.
kimchi.def = "바꿨지롱"어떻게 하면 public이지만 더 이상 변경할 수 없도록 만들 수 있을까? 즉 값을 보여주고는 싶지만 수정은 불가능하게 하고 싶다는 의미이다.
type Words = {
    [key:string] : string
}

class Dict {
    private words: Words
    constructor(){
        this.words = {}
    }
    add(word:Word){
       if(this.words[word.term] === undefined){
        this.words[word.term] = word.def;
       }
    }
    def(term:string){
        return this.words[term]
    }

    static hello() {
        return "hello";
    }
}

class Word {
    constructor(
        public readonly term:string,
        public readonly def:string
    ){}
}

const kimchi = new Word("kimchi", "한국의 음식");
const dict = new Dict()

dict.add(kimchi);
dict.def("kimchi");

kimchi.def = "바꿨지롱"
그럴때는 접근 제한자 뒤에 readonly를 붙여주면 된다!!
인터페이스는 우리에게 익숙한 타입(type)과 비슷하지만 두 가지 부분에서 다르다.
우선 타입을 사용하는 여러 용례를 보자.
// TS에게 object의 모양을 알려준다.
// 프로퍼티의 이름이 무엇인지, 그것의 타입은 무엇인지
type Player = {
    nickname : string,
    healthBar: number
}

const moon : Player = {
    nickname : "moon",
    healthBar : 10
}

// type Alias
type Food = string;

const pizza : Food = "delicious!"

type Friends = Array<string>

// type이 특정 값을 가지도록 제한한다.
type Team = "red" | "blue" | "yellow"
type Health = 1 | 5 | 10

// team은 red, blue, yellow 중 하나만 될 수 있다.
// health는 1, 5, 10중 하나만 될 수 있다.
type Player = {
    nickname: string,
    team:Team,
    health: Health
}

const nico :Player = {
    nickname: "nico",
    team: "red",
    health : 1
}
보다시피 타입은 매우 매우 다재다능한 키워드다. 오브젝트 모양을 묘사하는 데 사용할 수도 있고 타입 Alias를 만드는데도 사용할 수 있다. 그리고 타입이 특정 값을 가지도록 제한할 수 있다.
이제 오브젝트의 모양을 설명하는 다른 방법인 인터페이스에 대해 알아보자. 약간의 차이점은 있지만 거의 비슷하다.
인터페이스는 오직 한 가지 용도만을 가지고 있다. 바로 오브젝트 모양을 특정해주는 것이다.
interface Player  {
    nickname: string,
    team:Team,
    health: Health
}

const nico :Player = {
    nickname: "nico",
    team: "red",
    health : 1
}
타입과 인터페이스는 오브젝트 모양을 결정한다는 것에서 같은 역할은 한다. 하지만 다른 점은 타입 키워드는 인터페이스 키워드에 비해 좀 더 활용할 수 있는 게 많다.
// 인터페이스로는 이런걸 할 수 없다.
interface Hello = string
인터페이스는 오로지 오브젝트 모양을 타입스크립트에게 설명해주기 위해서만 사용되는 키워드이다!
반면에 타입은 다양한 목적으로 사용될 수 있다. 오브젝트 모양도 정해줄 수 있고, 특정 값들로만 제한할 수도 있고, 타입 Alias도 만들 수 있다.
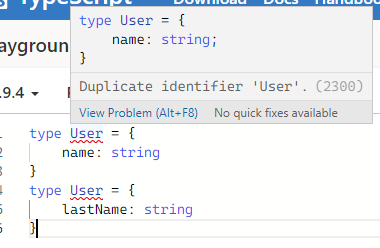
// 인터페이스를 사용한 경우

interface User {
    name:  string
}

// 이 인터페이스는 클래스와 닮아있다.
interface Player extends User {
}

const moon : Player = {
    name : "moon"
}

// 타입을 사용한 경우

type User = {
    name: string
}

type Player = User & {

}

const moon : Player = {
    name : "moon"
}
타입스크립트에게 오브젝트의 모양을 알려줄 때는 인터페이스를 사용하는 것이 더 깔끔해 보이고 객체지향 프로그래밍처럼 보이기 때문에 더 이해하기 쉽다.
인터페이스의 또 다른 특징으로는 프로퍼티들을 축적시킬 수 있다.
interface User {
    name:string
}

interface User {
    lastName:string
}

interface User {
    health:number
}

const moon :User = {
    name: "moon",
    lastName: "m",
    health: 10
}
그냥 인터페이스를 3번 각각 만들기만 하면, 타입스크립트가 알아서 하나로 합쳐준다.(타입으로는 불가능하다.)
요약 들어갑니다. 우리가 단순히 TS에 오브젝트 모양을 알려주고 싶다면 타입이나 인터페이스 중에서 아무거나 써도 된다. 하지만 인터페이스는 객체지향 프로그래밍의 개념을 활용해서 디자인됐고 타입은 더 유연하다.(조금 더 개방적이다.) 끝~
+참고자료
https://nomadcoders.co/typescript-for-beginners/lectures/3680


댓글